
CONFIGURING MICROSOFT OUTLOOK TO SEND AND RECEIVE EMAIL
| JUST BEFORE WE
START... Your
"old" email address
(you@bigpond.com or
whatever) will still work. Once we set up your new Professional
email, when you hit Send/Receive, Outlook will log in to Bigpond (or
whatever) and pick up any mail there, and then it'll log in to Bonza
and pick up your new Professional email. So! Let's set it up...
Open Microsoft Outlook and click on the Tools command near the top left of the screen. There'll be a drop down menu and it'll look like this: |
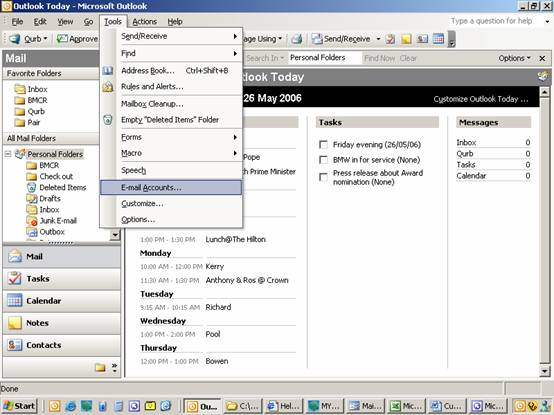
| Click on E-mail Accounts (third from the bottom of the list) and you'll be taken to a screen that looks like this... |
| A lot of the mystery
surrounding email will disappear if you understand this quirky
little bit of information about it: Outgoing mail is
sent via your Internet Service Provider (ISP). It'll be someone like
Bigpond. ISPs use SMTP (Standard Mail Transfer Protocol).
Incoming mail is received via your Domain which Bonza
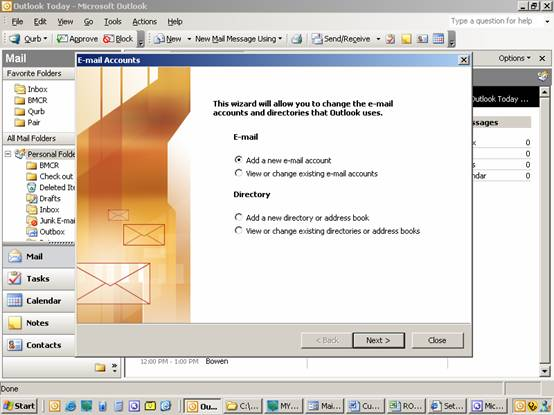
provides. We use POP3. (Post Office Protocol). Click so the "radio button" selects View or change existing email accounts and then click Next> This is LIKE what you'll now see. |
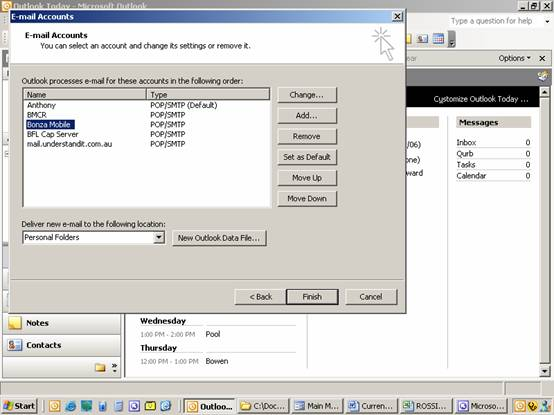
| Single left click on
an account (in the Name column). In the illustration above, I've
"selected" the Bonza Mobile
account. On the right, click on the top button Change. This is LIKE what you'll see: |
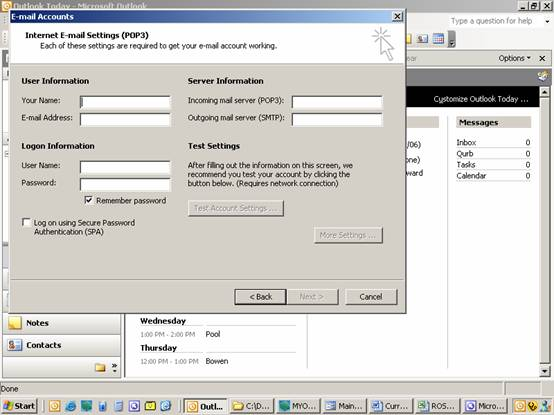
| The above screen
shot is LIKE what you'll see except, what you're looking at
has the fields completed. We're after the contents of the field Outgoing mail server (SMTP): It'll be something like mail.bigpond.com, mail.optusnet.com.au, or maybe even just mail. Write the information down, we'll need it shortly... Now click <Back then, click <Back again please. This time, click so the "radio button" selects Add a new e-mail account and then click Next>This is what you'll now see. |
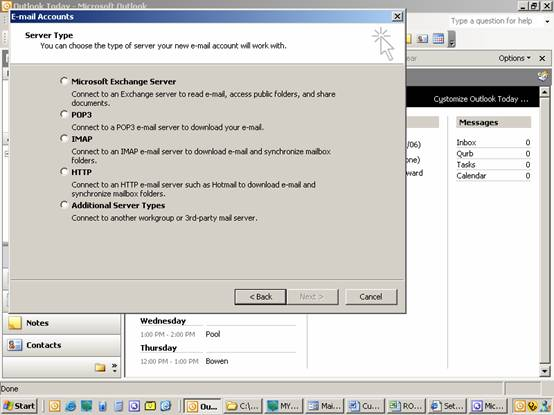
| Ooooooooooooo! Looks complicated, eh? Well, it's not. Click to add a radio button selecting POP3. Now click Next> |
| In the User
Information area, type in Your Name:
as you want it to appear
in the recipients In Box when you send them emails. I put my
business' name Bonzawebsites, but, I could have put my name Anthony
Williams.
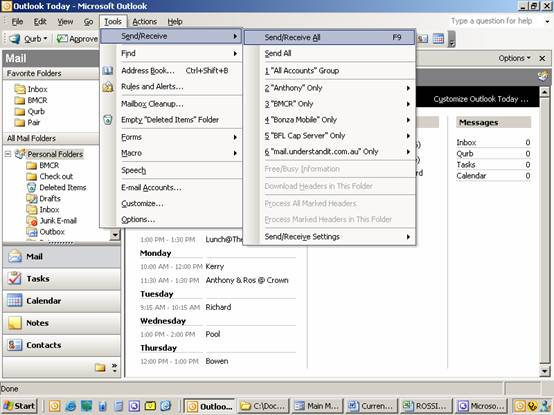
In the E-mail Address: field, type in the new email address you're setting up. In the Server Information area, type in your Incoming mail server (POP3): information which Bonza will have given you. (It'll be something LIKE mail.yourdomain.com). The Outgoing mail server (SMTP): information is the information you wrote down. In the Logon Information area, type in your User Name: and Password: which Bonza will have given you. Under the Password, click to put a tick in the "checkbox" Remember password. Now click Next> Beauty! You're being congratulated by a machine! Click Finish. You're now back at the standard Outlook screen. Let's try this baby out, eh? Click Tools, then, at the top of the list, Send/Receive and, from the "fly out" Send/Receive All. See it in the screen shot below. If you receive no error, you've set up the email address correctly. Bonzawebsites will have sent a test message for you to receive. That proves incoming mail works. Reply to the email to prove outgoing mail works too. |
| It really pays to be
familiar with a fantastic facility called Web Mail! It enables you to pick up your email from any computer anywhere in the world! Find out about it HERE Also, it's very important to set your Professional email address as your default email. Find out about that HERE |
There's heaps of helpful stuff like this at The Bonza Help Centre. To check it out, click on this image... |